
You want to experience more with your mountain bike. A mountain bike rack helps you transport gear securely. You can use it for tours, daily commutes, or bikepacking. Many models don't fit directly, especially on E-MTBs and full-suspension bikes. You are often faced with the question of which rack fits and how to mount it correctly.
With this guide, you will receive practical tips, concrete recommendations, and simple instructions for your success.
Key Takeaways
Choose the right type of rack for your mountain bike. Frame-mounted racks offer stability for heavy loads, while seatpost racks can be installed quickly.
Pay attention to the load capacity of your rack. Check the manufacturer's specifications to ensure you can transport your luggage safely.
Proper installation is crucial. Follow a step-by-step guide to ensure that the rack sits stably and securely.
Regular maintenance increases safety. Check all screws and connections monthly to avoid instability.
Choose high-quality materials. Aluminum is lightweight, steel is sturdy, and carbon offers a low weight. Look for corrosion protection for a long service life.
Mountain Bike Racks: Types
You will find different designs today when looking for a suitable mountain bike rack. Each design has its own advantages and is suitable for different purposes. Load capacity and mounting differ depending on the type. Especially with E-mountain bikes and full-suspension models, you must look for special solutions.
Frame Mounting
Frame-mounted racks offer you high stability. They are particularly suitable for longer tours and heavy loads. You attach them directly to the eyelets on the rear triangle of your bike. Many models are made of robust aluminum and carry up to 26 kg.
Tip: Before purchasing, check if your frame has the necessary mounting points.
Here you can see the load capacities in comparison:
Model |
Maximum Load Capacity |
|---|---|
UNI Super Tourist |
26 kg |
ElBurro |
25 kg |
Quick Rack XL from Ortlieb |
26 kg |
SKS Infinity Universal |
12 kg |
Frame-mounted racks do not block the suspension fork. They offer a secure solution for daily life and bikepacking.
Seatpost Racks
Seatpost racks are flexible and quickly installed. You clamp them directly to the seatpost. This version is suitable for light loads and short distances. The load capacity is usually between 5 and 10 kg.
An example: The MTX BeamRack carries up to 9 kg. Many models offer a compartment for a mini-pump and a tension strap.
Note: Always plan for a buffer so the material is not overloaded.
Adapters and Thru-Axles
Many modern mountain bikes do not have classic mounting points. Adapters and special thru-axles help here. You mount them on the axles or seat stays. This way, you can also attach a mountain bike rack to E-MTBs and full-suspension bikes.
These solutions offer flexibility if you own a bike without eyelets. The load capacity depends on the respective system. Always check the manufacturer's specifications.
Front Racks and Lowriders
You mount front racks and lowriders on the fork of your bike. They are suitable for light bags or additional luggage. The load capacity is usually between 5 and 15 kg.
Make sure the suspension fork is not blocked. Many models offer simple installation and adjustable supports. Safety features like reflectors and elastic cords increase visibility.
Here is an overview of the load capacities of different models for E-mountain bikes and full-suspension mountain bikes:
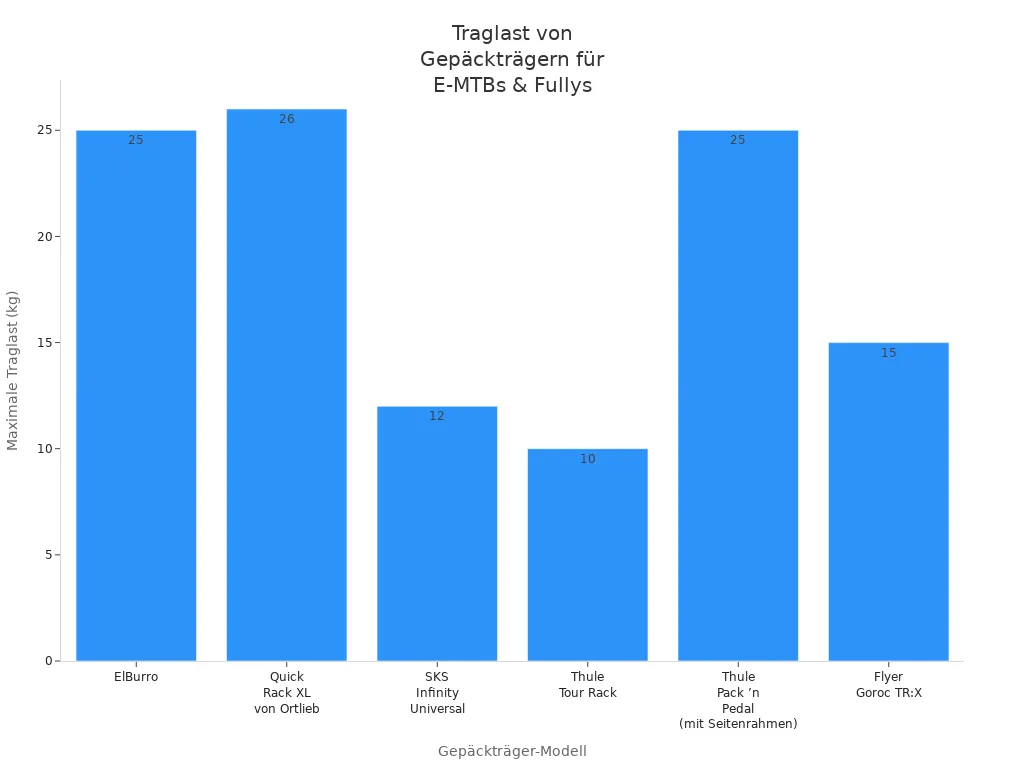
Note: Before purchasing, you should always check the mounting options. Not every rack fits every bike.
With this information, you can find the right type for your mountain bike. This allows you to transport luggage safely and comfortably.
Materials and Properties
Aluminum, Steel, Carbon
For mountain bike racks, you will usually find the materials aluminum, steel, or carbon. Each material has its own advantages and disadvantages. Aluminum is very popular because it is lightweight. You can move your bike easily with it. Steel is heavier but sturdier. Carbon is rare, but offers a very low weight.
Material |
Weight |
Stability |
|---|---|---|
Aluminum |
Light |
Lower |
Steel |
Heavier |
Higher |
Carbon |
Very light |
Medium |
Aluminum is well-suited for tours where you want to keep weight in mind. Steel can withstand high loads. Carbon is interesting for you if you prefer a particularly lightweight bike.
Weight and Stability
The weight of your rack influences how the bike handles. A lightweight aluminum or carbon rack makes your bike agile. A heavy steel rack provides more stability, especially with heavy luggage. You should consider how much load you want to transport. For heavy bags, a sturdy steel rack is recommended. For short trips and little luggage, an aluminum rack is often sufficient.
Tip: Always check the maximum load capacity of your rack. This way you avoid damage to the material.
Corrosion Protection
The lifespan of your rack depends heavily on the material. Aluminum hardly rusts but sometimes gets small scratches. Steel is durable but requires maintenance and a protective coating against rust. Carbon does not rust and remains resistant even in wet conditions. Titanium is rare but extremely durable and corrosion-resistant.
Material |
Corrosion Resistance |
|
|---|---|---|
Carbon |
Sensitive to impacts, low durability |
No corrosion, very resistant |
Aluminum |
Loss of stability over time |
Corrodes slowly and on the surface |
Steel |
Good durability, maintenance needed |
Prone to rust, requires coating |
Titanium |
Best durability |
Corrosion-resistant without coating |
If you often ride in the rain or during winter, you should pay attention to good corrosion protection. A well-maintained rack lasts longer and remains safe.
Mountain Bike Racks: Installation
Step-by-Step Instructions
You want to attach your new rack safely and stably to your mountain bike. Follow these steps to avoid errors and ensure full functionality:
Assemble the rack
First, assemble the individual parts of the rack. Attach the side support struts to the rack plate using the included screws and nuts. Use a torque wrench to ensure all connections are tight.Prepare the frame
Remove any existing fenders. Check the threaded eyelets on the frame. They must be clean and free of dirt.Adjust the struts
Adjust the struts to the shape of your bike. Bend them carefully and shorten them to the correct length so that the rack sits straight and securely later.Mounting to the drill holes
The dropouts of your frame often have two drill holes with a 6 mm diameter. These usually have no threads. You can cut a thread or use countersunk screws with nuts from the outside.Final check
Check all screws and connections. Tighten them and ensure a firm fit. A correctly mounted rack ensures stability and safety.
Tip: A lower center of gravity for the rack improves riding stability, especially with heavy luggage.
Specifics for E-MTB and full-suspension bikes
E-mountain bikes and full-suspension models pose specific challenges. The suspension must not be blocked or damaged. You must mount the rack at the correct points so that the dampening can move freely.
Full-suspension mountain bikes require special solutions. Classic racks can restrict or even damage the dampening.
Seatpost racks or customized systems adapt to the moving frame.
Hardtail bikes often allow frame mounting if the appropriate mounting points exist.
Ensure that the rack does not collide with moving parts. Regularly check that all screws are tight and the suspension remains free.
Note: On E-MTBs, you should protect the cables and the battery area. Prevent the rack from pressing on sensitive components.
Mounting on seatpost and seat stays
You can also attach a rack to the seatpost or seat stays. These versions are especially suitable for bikes without classic mounting points.
Seatpost racks are quick to install. You clamp them directly to the seatpost. Pay attention to the maximum load and material compatibility.
Seat stays often offer alternative mounting options. Use adapters if no eyelets are available. They provide a secure hold, even with modern frame shapes.
An incorrect installation can lead to instability. Riding behavior deteriorates and the risk of accidents increases. The mounting screws must engage correctly in the threads. Check all connections regularly.
Mounting Type |
Advantages |
Safety Notes |
|---|---|---|
Frame mounting |
High stability |
Only with suitable holes |
Seatpost rack |
Quick installation |
Limited load capacity |
Seat stays with adapter |
Flexible for modern bikes |
Attach adapter correctly |
Attention: A correctly installed mountain bike rack increases safety and ensures a pleasant riding experience.
Purchase Criteria
Compatibility and Payload
You want your mountain bike rack to fit your bike perfectly. First, check whether the rack is compatible with your frame and fork. Many models offer different mounting options. You can securely transport bags, baskets, child seats, or even a trailer.
Pay attention to the maximum payload. Seatpost racks carry less weight than frame-mounted racks. The load capacity determines how much luggage you can safely take with you.
Rack Type |
Maximum Load Capacity |
|---|---|
Seatpost rack |
|
Frame-mounted rack |
Higher load capacity |
Tip: Always plan for a buffer. Do not overload the rack so that you can ride safely.
Ease of Installation
You benefit from simple handling. A good rack can be installed quickly and easily. Many manufacturers provide clear instructions and the appropriate tools.
Ensure that you can attach the rack without special expertise. Adapters help you if your bike does not have classic eyelets.
Flexible mounting saves time and nerves. You can often remove the rack easily as well.
Simple handling
Flexibility during mounting
Safety and Load Limits
Safety always comes first. You should know and observe the load limits of the rack. There are major differences in the materials. Aluminum is lightweight and carries 20–30 kg. Steel is more robust and can withstand over 40 kg.
Travel-friendly models offer a low positioning for panniers. This improves handling when you are transporting a lot of luggage.
Rack Type |
Material |
Maximum Load |
Notes |
|---|---|---|---|
Aluminum |
Lightweight |
20-30 kg |
Lower load capacity, difficult to repair. |
Steel |
More robust |
Over 40 kg |
Higher load capacity, can be welded anywhere. |
Travel-friendly |
Variable |
Depends on design |
Low pannier positioning improves handling when fully loaded. |
Note: A sturdy and correctly installed rack ensures safe transport. Regularly check all screws and connections.
Top Recommendations 2025
Bestsellers and New Releases
You want to know which models are particularly popular in 2025. Many manufacturers offer innovative solutions for your mountain bike. The following brands and models are among the most popular and newest on the market:
Cube Acid rack: You benefit from high stability and excellent build quality.
Racktime rack: You can mount these quickly and easily. The system is practical and innovative.
Thule rack: You are choosing durable products that are suitable for long tours and heavy loads.
Topeak rack: You use flexible systems with quick-mount features and plenty of accessories.
Tubus rack: You get extremely stable and lightweight models that are ideal for cycling trips.
Tip: Many new releases offer you improved attachment systems and higher load capacities. You will also find special solutions for E-MTBs and full-suspension bikes.
Price-Performance Tips
You want to avoid paying too much while still getting quality. The following models offer a good balance of price and performance:
Model |
Advantages |
Price Range (€) |
|---|---|---|
Racktime Light |
Easy to mount |
45 - 65 |
Topeak MTX BeamRack |
Quickly detachable |
50 - 70 |
Cube Acid Universal |
60 - 80 |
You save money by focusing on the most important features. You can often find good value for money with well-known brands. You should pay attention to load capacity and ease of mounting.
Recommendations for different uses
You use a mountain bike rack for various activities. For everyday use, a rear rack is recommended. Use it to safely transport groceries or school bags. For tours and cycling trips, choose touring or travel-bike racks with increased load capacity. In the bikepacking sector, front racks are popular because they help you distribute weight evenly. E-bike racks are suitable for the higher weight of e-bikes. The Aeroe rack system helps you with bikepacking. You mount it easily and use waterproof bags for longer tours.
Note: You should always check for compatibility with your bike. Verify that the rack fits your frame and meets your requirements.
Accessories and Extensions
Panniers and Baskets
You want to transport your gear safely and conveniently. Panniers and baskets help you do this. Many bags can be quickly attached to the rack. For example, you can use Ortlieb bags with a QLS adapter. They offer fast attachment and removal. The load capacity is 3 kg. Vaude uses a hook-mounting system. You simply attach the bag to tubes with a diameter of 8 to 16 mm.
MIK and MIK-HD racks allow you to mount items without tools. You can transport up to 15 kg. The Coolcave basket offers 19 liters of capacity. The adjustable KLICKfix mounts fit most racks.
Tip: Choose bags and baskets that fit your rack. This keeps everything secure and stable.
Tension Straps and Mounting Systems
Secure your luggage with tension straps and smart mounting systems. These accessories prevent your load from slipping. Many modern racks, such as ElBurro and Ortlieb's Quick Rack, feature pivot points. They adapt to the movements of your mountain bike, which ensures more safety.
Ortlieb's Quick Rack offers you special stops. Your bags won't slide back and forth. You can easily attach and release tension straps.
Tension straps hold bags and baskets firmly in place.
Pivot points provide flexibility while riding.
Stops prevent the load from slipping.
Mudguards and Reflectors
Increase your safety with mudguards and reflectors. Mudguards protect you and your luggage from water and dirt. Reflectors make you more visible in the dark.
You can easily mount reflectors with a hex screw. The material withstands the demands of road traffic.
Accessory |
Benefit |
|---|---|
Mudguard |
Protection from wet and dirt |
Reflector |
More visibility in the dark |
Note: You should always ensure good visibility. This way, you stay safe on the road, even in poor light conditions.
Loading and Safety
Weight Distribution
You should always distribute weight well on your mountain bike. Intelligent weight shifting improves control and stability. Many riders put too much weight on the rear wheel. This can lead to problems when cycling uphill.
You improve steering if you shift some of the weight to the front wheel.
Low-rider bags on the front fork help you move the weight forward.
An uneven distribution makes the bike difficult to steer and can be dangerous.
Tip: Pack heavy items as low and as close to the axles as possible. This keeps your bike stable, even on uneven terrain.
Influence on Handling
The load on your rack directly affects your handling. An even distribution between the front and rear wheels ensures a safe riding experience.
With heavy loads, your bike may start to sway. This impairs steering and makes riding unsafe.
An overly long stay on the rack can amplify vibrations. This feels unpleasant and can be dangerous.
With a short, standard stay, handling usually remains stable.
You will notice the frame swaying under a heavy load if the stay is too long.
This makes steering difficult and can throw you off balance.
With a stable, short stay, your bike remains easier to control.
Note: Always test your bike with luggage on a short route before starting longer tours.
What should not be transported
Not everything is suitable for transport on a mountain bike rack. Seatpost racks in particular are unsuitable for some items.
Large or heavy loads impair the handling of the saddle, especially off-road.
You should not transport bulky or unstable items that could slip.
Avoid transporting fragile or valuable items unsecured.
Attention: Safety comes first. Do not overload your rack and regularly check the attachment of your load. 🚲
Maintenance and Care
Cleaning and Corrosion Protection
You want your mountain bike rack to last a long time and always remain safe. Regular cleaning protects against dirt and rust. You can use special bicycle cleaners to thoroughly clean the rack. Multi-foam helps you remove stubborn dirt. Care sprays provide additional protection against corrosion.
Many riders use Muc-Off Bike Protect PTFE care spray. It leaves a non-sticky protective film on the material and protects against moisture. F100 protective and care oil stops existing corrosion and keeps the rack smooth.
You should also not forget about frame care. It removes dirt, provides shine, and protects against rust.
Tip: Clean your rack after every ride in the rain or on muddy paths. This keeps the material stable and safe.
Checking and Retightening
You increase safety if you regularly check all screws and fastenings. Loose connections can lead to instability. It is best to check once a month whether all parts are tight.
A table will help you keep track:
Maintenance Step |
Recommended Frequency |
|---|---|
Check screws |
Monthly |
Check stays |
Monthly |
Renew corrosion protection |
After every cleaning |
Retighten loose screws immediately. This prevents damage to the frame and the rack.
Attention: A loose part can become dangerous while riding.
Replacement of Wear Parts
You can often recognize wear parts by small cracks, rust spots, or bent stays. Replace damaged parts immediately. You can find replacement parts from many manufacturers or at specialist retailers.
Important wear parts are:
Screws and nuts
Stays and adapters
Fastening elements
You should always use original parts. They fit precisely and offer the best safety.
Note: Check the stability of the rack after every replacement. This keeps your mountain bike reliable and safe on the road. 🛠️
You have many options for equipping your mountain bike with a suitable rack. Always pay attention to proper installation and regularly check for safety. Choose a model that suits your requirements. Quality pays off. Rely on stable materials and pay attention to the maximum load capacity. This way, you transport your luggage safely and reliably.
Remember: Your safety and riding enjoyment always come first!
FAQ
How do I find the right rack for my mountain bike?
First, check the mounting points on your frame. Compare the load capacity and material. Manufacturers often provide compatibility lists. You can also use adapters if your bike does not have eyelets.
Can I mount a rack on a full-suspension mountain bike?
You can use special adapters or seatpost racks. These solutions adapt to the moving frame. Make sure that the suspension remains free and no parts are blocked.
What is the maximum weight I can transport?
Follow the manufacturer's specifications. Seatpost racks usually carry 5 to 12 kg. Frame-mounted models often handle up to 26 kg. Never overload the rack to avoid damage and accidents.
Do I need to maintain my rack regularly?
Check all screws and connections monthly. Clean the rack after riding in rain or mud. Renew the corrosion protection so that the material lasts a long time.
Which bags fit my mountain bike rack?
Choose bags with compatible mounting systems such as QLS, MIK, or KLICKfix. Check the tube diameters and the maximum load capacity. Manufacturers provide recommendations for compatible models.